- Saviynt Forums
- Saviynt Exchange
- Community Sourced Integrations
- TeamDynamix Integration Guide
- Subscribe to RSS Feed
- Mark as New
- Mark as Read
- Bookmark
- Subscribe
- Printer Friendly Page
- Notify a Moderator
- Subscribe to RSS Feed
- Mark as New
- Mark as Read
- Bookmark
- Subscribe
- Printer Friendly Page
- Notify a Moderator
09/28/2023 03:23 AM - edited 09/28/2023 04:32 AM
Disclaimer
The integration was either created by Saviynt or by Saviynt community users . The integration is available “as is” and fall under standard connectors support for REST, SOAP, JDBC, LDAP, PowerShell, Jar and Saviynt Connector Framework.
Note: Contributor - Manju Kumari
Understanding the Integration between EIC and TeamDynamix
Preface
This guide describes the integration between Saviynt Enterprise Identity Cloud (EIC) and TeamDynamix.
Audience
This guide is intended for administrators and target application integration teams responsible for implementing a secure integration service with TeamDynamix for RPA.
Introduction
TeamDynamix is a company that provides cloud-based IT service management (ITSM), project portfolio management (PPM), and enterprise service management (ESM) solutions for organizations in various industries, including higher education, government, healthcare, and more. The company's platform is designed to help organizations streamline their IT operations, improve service delivery, and enhance the overall customer experience.
Key features and capabilities of TeamDynamix's platform typically include:
IT Service Management (ITSM): TeamDynamix offers tools for managing IT service requests, incidents, problems, changes, and other ITIL (Information Technology Infrastructure Library) processes. This helps organizations efficiently handle and resolve IT-related issues.
Project Portfolio Management (PPM): The platform enables organizations to plan, prioritize, and manage their projects and initiatives. It provides visibility into project status, resource allocation, and financial tracking.
Enterprise Service Management (ESM): Beyond IT, TeamDynamix can extend service management principles to other departments within an organization, such as HR, facilities, and finance, to improve service delivery across the enterprise.
Service Catalog: Users can create and manage a catalog of services offered by their organization, making it easy for employees or customers to request and access the services they need.
Knowledge Management: TeamDynamix typically includes knowledge base functionality to store and share information, FAQs, and best practices, helping users find answers to common questions.
Automation: Automation features are often included to streamline repetitive tasks and workflows, reducing manual effort and improving efficiency.
Reporting and Analytics: The platform provides reporting and analytics tools to track key performance indicators, monitor service levels, and make data-driven decisions.
Integration: TeamDynamix may offer integrations with other software systems and third-party applications to create a seamless and interconnected IT and service management ecosystem.
Mobile Accessibility: Many ITSM solutions, including TeamDynamix, provide mobile apps or mobile-friendly interfaces to allow users to access and manage services from their mobile devices.
Self-Service Portal: Users can often access the platform through a self-service portal to submit requests, track progress, and find information independently.
TeamDynamix is known for its focus on the needs of educational institutions, including colleges and universities, but its capabilities can be adapted for various organizations looking to improve their service management and project portfolio management practices. It aims to help organizations deliver better services, enhance collaboration among teams, and achieve their strategic goals more effectively. Please note that specific features and offerings may evolve over time, so it's a good idea to visit the official TeamDynamix website for the most up-to-date information on their products and services.
Overall, TeamDynamix is a comprehensive ITSM solution that helps organizations enhance their IT service delivery, improve user satisfaction, and optimize IT operations.
For more information about different connectors in EIC, see Connectors Documentation.
Supported Features
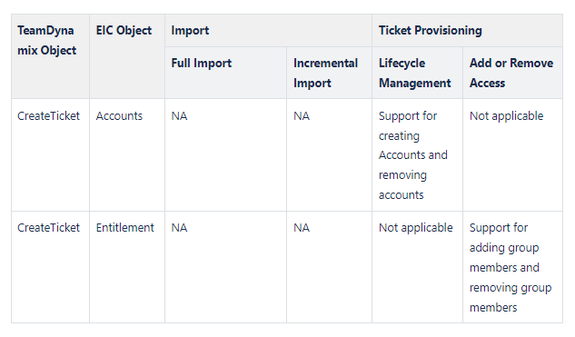
The TeamDynamix integration supports the following features:

Supported Software Versions
Software | Version |
EIC | Release v4.5 and later |
Understanding the Integration between EIC and TeamDynamix
You must create an integration between EIC and the collaboration platform hosted by the target application to perform import, provisioning, and deprovisioning tasks. The following components are involved in the integration:
The Complete Service Management platform TeamDynamix combines ITSM with ESM and SIAM capabilities, enabling all internal departments, such as IT, HR, and Facilities, as well as external service providers and customers, to collaborate securely and seamlessly on one complete platform, reducing complexity and improving productivity.
Objects are imported as entitlement types into EIC.
Security System represents the connection between EIC and the target application.
It comprises of an endpoint, which is the target application for which you want EIC to manage the identity repository.
It provides application instance abstraction from connectivity including high-level metadata. For more information about creating a security system, see Creating a Security System.
Endpoint is an instance of an application within the context of a security system.
It is the target application or application from which the connector imports the data and performs provisioning or deprovisioning of identity objects, such as users, accounts, and entitlements.
It is mandatory to create an endpoint after creating the security system.
You can associate a single security system with multiple endpoints if the deployment involves modelling of multiple isolated virtual applications (based on sets of specific entitlements according to certain categories) within a single application instance. For more information about creating an endpoint, see Creating an Endpoint for the Security System.
Connector is a software component that enables communication between EIC and the target application. It provides a simplified integration mechanism where in some instances you only need to create a connection with minimal connectivity information for your target application. The REST connector is used for importing, provisioning accounts and access through the REST APIs. For more information about creating a connection, see Creating a Connection.
Job Scheduler is a software component that executes a job based on the configured schedule to perform import or provisioning operations from EIC.
When a provisioning job is triggered, it creates provisioning tasks in EIC. When these tasks are completed, the provisioning action is performed on the target application through the configured connector. If you want to instantly provision requests for completing the tasks without running the provisioning job, you must enable Instant Provisioning at the security system level and the Instant Provisioning Tasks global configuration. For more information about the jobs used by the connectors in the TeamDynamix integration.
Integration Architecture
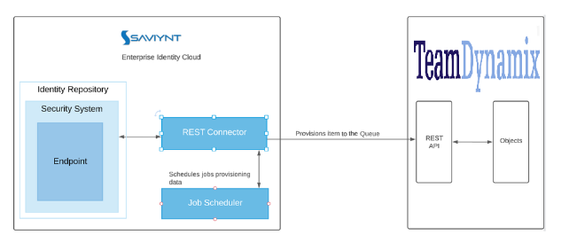
EIC uses a REST connection for integrating with TeamDynamix for performing provisioning items in TeamDynamix Queue. The REST connection uses the REST protocol to communicate with the REST interface of TeamDynamix.
The following diagram illustrates the integration architecture and communication with the target application.

Setting Up the Integration
Prerequisites
Authentication to TeamDynamix is through an Access Token please follow below steps.
Registering an Application
In order to start using OAuth 2.0, you'll first need to create and register an application with the desired service. This process is different for every service, but will typically involve providing basic information like an application name, company logo, etc. You'll also need to authorize a redirect URI for TeamDynamix. When prompted, you must provide the TeamDynamix redirect URI, which is [TeamDynamix Base URL]/TDAdmin/OAuth/Callback.
For example, if your TeamDynamix base URL is https://abuniversity.teamdynamix.com, then the redirect URI you need to register will be:
https://abuniversity.teamdynamix.com/TDAdmin/OAuth/Callback
Additionally, some services may also require that you authorize Javascript origins. In that case, you'll need to provide your TeamDynamix base URL, which would be https://abuniversity.teamdynamix.com from the previous example.
For more detailed information about registering an application with Google, see Google's documentation.
Make sure to take note of your application's Client ID and Client Secret, as you'll need those pieces of information later on in the configuration process.
Creating the Auth Account
First, log into Admin and create a new auth account:
In TDAdmin, click Applications in the left navigation.
Click the desired Application Name.
In the ticketing application, go to Workflow Web Services > Web Service Auth Accounts
Click the New button.
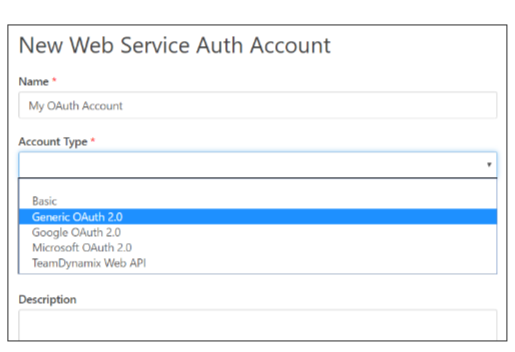
Now, on the Auth Account screen, begin filling out the Name, Account Type, and Description fields.
In the Account Type dropdown, you'll see three options pertaining to OAuth 2.0.
Generic OAuth 2.0
Google OAuth 2.0
Microsoft OAuth 2.0

If you're building a web service call to Google or Microsoft, you should select the appropriate type. While you can build auth accounts for these services through a Generic OAuth 2.0 account, selecting one of those two options will require you to enter less information to get your account configured.
At this point you'll notice a handful of OAuth specific fields which you'll need to provide. Each of those fields is discussed in detail below.
Authorization Endpoint
This is the URI for the endpoint on the authorization server used to obtain authorization. If you are using a Google or Microsoft account type, you will not need to provide this field. For any other service, you'll need to enter the endpoint provided by that service.
For example, Google's OAuth 2.0 authorization endpoint is:
https://accounts.google.com/o/oauth2/v2/auth
TeamDynamix will automatically append the query string parameters required by the OAuth 2.0 specification when you go to generate an access token. Some of the values for these parameters will be taken from the information you provide while configuring the account, while others are simply provided by TeamDynamix. These parameters include the following.
access_type
client_id
origin
prompt
redirect_uri
response_type
scope
state
If your authorization server requires additional parameters, they can be added to the end of your authorization endpoint. For example, Google's authorization endpoint supports an optional login_hint parameter that you can provide.
To supply this parameter, you would simply enter the authorization endpoint as shown below:
https://accounts.google.com/o/oauth2/v2/auth?login_hint=myemail@gmail.com
You can also supply multiple parameters in this way by using an ampersand character (&) to delimit them. For example, Google supports an additional parameter called include_granted_scopes. You could supply both the login_hint and include_granted_scopes parameters as follows:
Token Endpoint
This is the URI for the endpoint on the authorization server used to exchange an authorization grant for an access token. Just like with the Authorization Endpoint, you will not need to supply this field for Google or Microsoft accounts. This endpoint should also be provided to you by the service against which you are authenticating.
For example, Google's OAuth 2.0 Token Endpoint is:
https://www.googleapis.com/oauth2/v4/token
Client ID
This is the string representing the public registration information provided by your client application. You should receive a Client ID when you register your application.
Client Secret
This is the string representing the confidential secret provided by your client application. Depending on your application, you will typically receive a Client Secret alongside your Client ID when registering your application. If your application provided you with a client secret, you must provide it here.
Scope
This specifies the scope of the access request. The value is expressed as a list of space-delimited, case-sensitive strings identified by the authorization server. You will need to determine which permissions you will need to make your web service call and specify them here.
For example, let's say I'm trying to build a web service method that writes to a Google sheet. You can see from the Google's scope documentation that you'll need to provide the https://www.googleapis.com/auth/spreadsheets scope in order to authorize that access.
Note that for Microsoft accounts, offline_access will automatically be appended to the scope, as that is required by TeamDynamix.
Generating an Access Token
Once you've provided all of the above fields, you're ready to generate an access token.
To ensure that your web service methods succeed, you will need to generate the tokens by logging in with a user who has permission to perform any of the desired web service method actions.
Click on the Generate button beside the Access Token field to visit the OAuth 2.0 authorization endpoint where you will be prompted for your credentials in the external system and authorize access for the provided scopes. Once you've successfully authorized the application, you should see a message indicating that the access token was generated successfully. At this point, your account has been configured successfully and you can now activate it by checking the Active checkbox and clicking the Save button.

Calling a Web Service Method Using an OAuth 2.0 Auth Account
Now that you've configured your OAuth 2.0 web service auth account, it's time to put it to work. Start by navigating to the Web Service Methods page and clicking the New button.
In TDAdmin, click Applications in the left navigation.
Click the desired Application Name.
In the ticketing application, go to Workflow Web Services > Web Service Auth Accounts
Click the New button.
Refreshing Access Tokens
When you generate an access token, that token will only be valid for a set amount of time (usually an hour) before it expires. This is why the authorization server will also supply something called a refresh token alongside the access token. TeamDynamix captures this refresh token and uses it to generate a new access token automatically when the old one expires. You don't need to configure anything for this to work, TeamDynamix will simply take care of refreshing your access tokens for you.
Creating a Connection
Connection refers to the configuration setup for connecting EIC to target applications. For more information about the procedure to create a connection, see Creating a Connection.
Understanding the Configuration Parameters
While creating a connection, you must specify connection parameters that the connector uses to connect with the target application, define the type of operations to perform, the target application objects against which those operations are performed, and the frequency of performing them. In addition, you can view and edit attribute mappings between EIC and the target application, predefined correlation rules, and provisioning jobs and import jobs.
Configuration Parameters for Account and Access Import
The connector uses the following parameters for creating a connection and for importing account and access from the target application:
Connection Parameters
Parameters | Description |
Connection Name * | Provides a unique name for the connection. |
Connection Description * | Provides the description for the new connection being created. |
Connection Type * | Select the connection type as REST. |
Save Template | Allows you to save the connection template with the specified parameter values. Click Save Template and specify the template name. |
Email Template | Provides the email template applicable for notifications. Email notifications provides immediate trigger of emails to respective user based on actions performed. Emails acts as one of the notifications to user informing which action has been performed and if critical, needs immediate action from the user. |
Default SAV Role | Provides the SAV role for which you want to assign access to the newly created connection. The SAV role is a EIC Role used to give specific access to a User. For example, if ROLE_User is selected then user(s) assigned the ROLE_User are given access to this connection. |
Connection JSON
| Specify this parameter to establish a REST connection with TeamDynamixapplication. Refer to the Connection Package |
Provisioning Parameters for Creating Queue and Fetching Queue Status
To create Queue in TeamDynamix, poll and fetch the status of Queue when WSRETRY job is run, specify the below mentioned parameters.
Parameter | Description |
CREATETICKETJSON | Specify this parameter to create Queue in TeamDynamix. When you run the WSRETRY job using the CREATETICKETJSON parameter, it creates Queue in TeamDynamix. The possible status of Queue in TeamDynamixare: Open, Closed, or Pending. The ticket remains in Open status in TeamDynamix it is automatically or manually completed in TeamDynamix. |
Ticket Status JSON | Refer to the Connection Package |
Importing Connection Package
connection package helps you build the connection with pre-defined JSONs, this can be used if your tenant does not already have out of the box connection templates available. Here are the steps to import the TeamDynamix connection package.
Download the connection package.
Navigate to Admin → Transport → select Import Package.
Browse the downloaded package and Import.
Navigate to Admin → Connections → Select “TeamDynamix ” Connection.
Edit the connection with your TeamDynamix tenant details.
Creating a Security System
The security system represents the connection between EIC and the target application. For more information on creating a security system, see Creating a Security System.
Creating an Endpoint for the Security System
Endpoint refers to the target application used to provision accounts and entitlements (access). For more information on creating an endpoint, see Creating Endpoints.
Using the TeamDynamix Integration
You can use the TeamDynamix integration for performing import and provisioning operations after configuring it to meet your requirements.
Guidelines for Using the Integration
You must apply the following guidelines for configuring import:
Run account import before running the access import.
Map all TeamDynamix attributes to EIC account attributes using ImportAccountEntJSON.
You must apply the following guidelines for configuring provisioning:
Use Java ternary operators if you want to add conditions in the provisioning parameters. You can use Java operations to tweak any attributes by using if-else conditions, substrings, or operators in the JSON for provisioning.
Troubleshooting
To troubleshoot common problems with connectors, answer frequently asked questions, and provide solutions to a few common issues you might encounter while configuring or working with connectors, see Common Troubleshooting Guide for Connectors.
To troubleshoot common problems or obtain answers for frequently asked questions for REST connectors, see the REST Connector Guide.
Note: Ensure that you record the token expiry duration during the initial token generation. The connection may fail, if the token is not refreshed.
